
- Nail drill bits are essential for professional nail technicians and DIY nail enthusiasts. They come in various shapes and sizes, each designed for specific purposes.
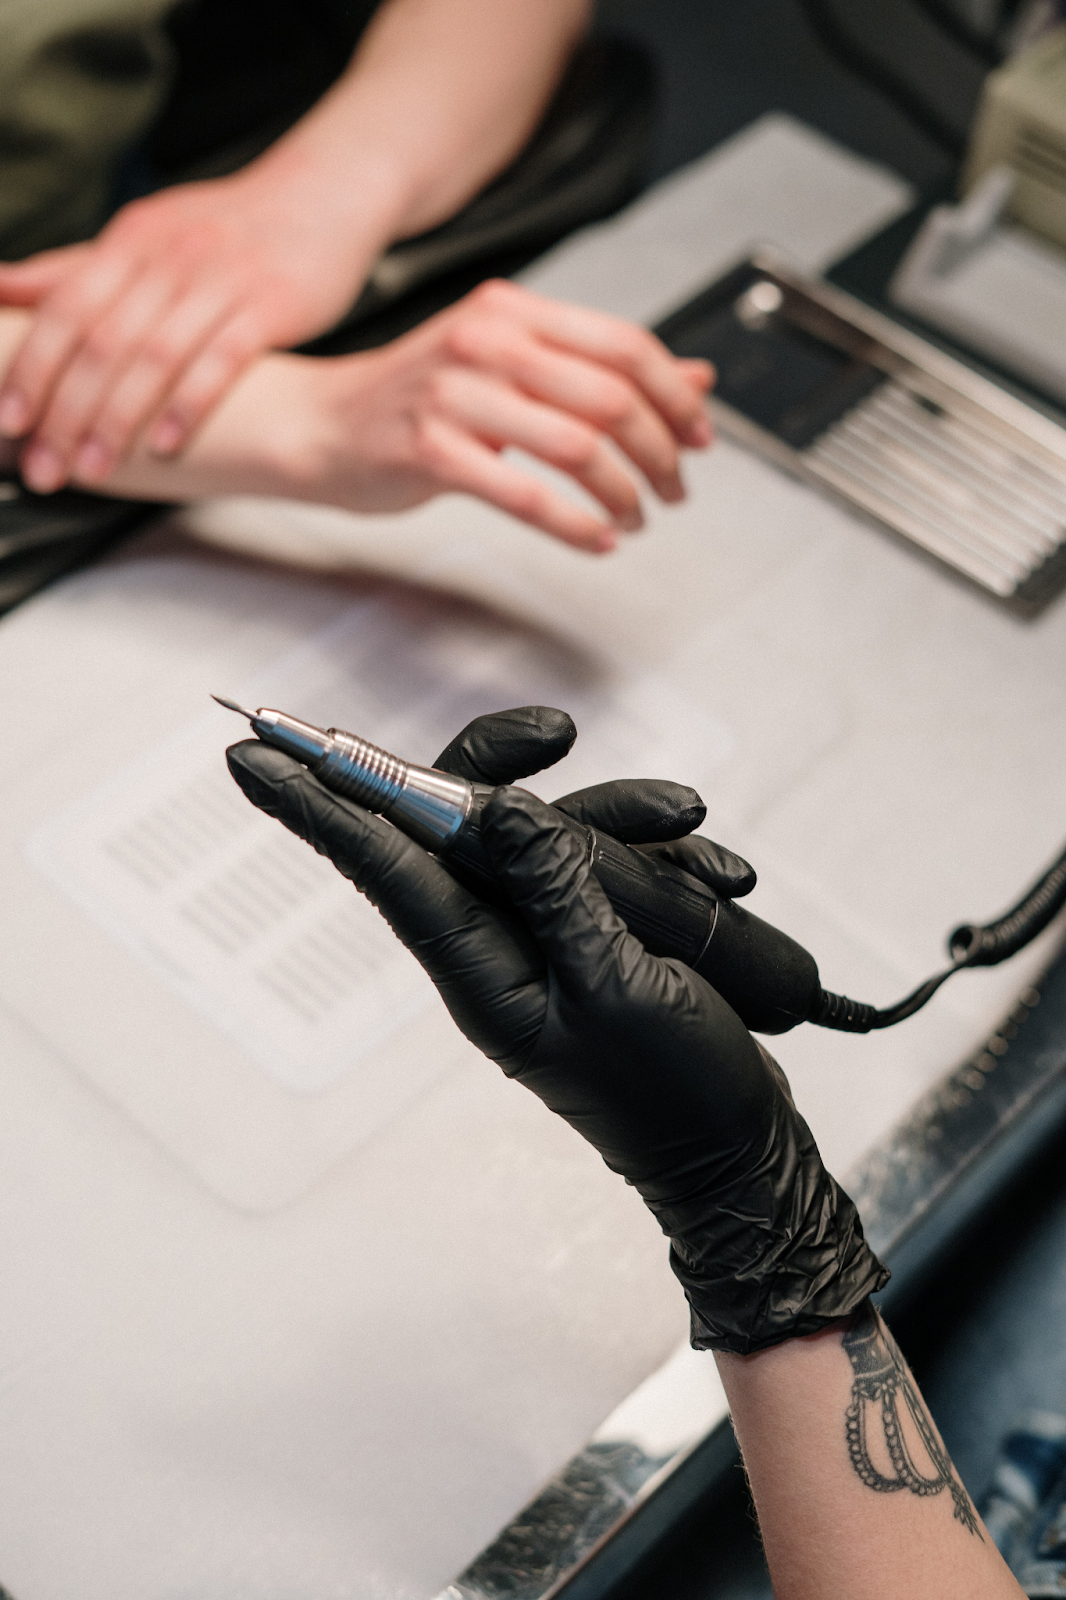
- Always prioritize safety when using nail drill bits. Proper training and technique are crucial to avoid injury or damage to your natural nails.
- Some common nail drill bit types include carbide bits, diamond bits, and sanding bands. Carbide bits are durable and ideal for acrylic nails, while diamond bits work well for natural nails and cuticle work.
- Grit refers to the coarseness of the bit’s surface. Lower grit numbers indicate a coarser texture for more aggressive filing, while higher grit numbers are finer and suitable for smoothing and finishing.
No matter whether you have plans on becoming a professional nail technician or you’re simply interested in saving some money and learning how to do your own nails from home – mastering the nail drill (and more specifically, the drill bits) will ensure that your at-home acrylics are on par with the salon!
Wondering why? We’re here to help

Put simply, a nail file is essentially a type of nail tool that is used by nail technicians to gently buff the natural nail, help to shape the acrylic nails over the top to the client’s desired shape, as well as to tidy up any excess cuticle, dirt or acrylic around the nail edges to achieve a clean, professional look.
Usually, the nail drill will come with a variety of different bits that can be used for various purposes, although most technicians will purchase them separately.
So, if you’re currently curious about learning how to do your own nails and you want to figure out your way around the nail drill and all of the different bits that it comes with – you’re in the right place!
Below, not only are we going to be talking you through the main drill nail bits, but we are also going to be providing you with expert insights that will help you achieve your desired results – time and time again. Read on!
Before You Get Started
- Prioritize safety when using nail drill bits. Learn how to use them properly and take necessary precautions to protect your nails and skin from harm.
- Learn about the several types of nail drill bits that are-available, including their sizes, forms, and applications. Understanding the fundamentals is crucial since various parts work better for different jobs.
- Nail drill bits require practice to master. Start with simple techniques and work up as you gain more experience.
- Selecting the appropriate nail drill for your needs is crucial. Consider factors like speed control, portability, and noise level to find a drill that suits your preferences and skill level.
Nail Drill Bits: The Beginner’s Guide
Seeing as you’ve already clicked on this article, we’re going to assume that you’re here to learn a thing or two about how to use a nail drill to achieve professional-looking acrylic nails!
However, before we jump any further, we first want to take a moment to encourage you to complete a nail drill course prior to using one, as they can be dangerous to use and can damage your natural nail beds if they are not used properly.
By taking the time to complete a nail drill course, you will be able to use your nail drill with the peace of mind that you know how to use it – and that goes for both at-home, personal use as well as nail technicians in the making.
The last thing you want to happen is to use your nail drill while giving a manicure, only to discover that you’ve damaged the nail beds!
Nevertheless, even though it’s important to make sure that you will be able to use your nail drill safely, it’s just as important to make sure that you know your way around all of the different types of nail drill bits that you will find yourself using!
One of the biggest culprits of damaged nail beds is using the wrong drill bit, so it’s super important to make sure that you have the knowledge to be able to discern between all of the various types when deciding which one is best for the task at hand – such as cleaning away excess cuticle or simply buffing the natural nail to prepare it for the acrylic.
Even though it can seem a little overwhelming (especially if you’ve never used a drill bit before) then rest assured that we are here to help you.
After taking the time to read through this guide, you should find that you have a much better understanding of all of the most commonly used nail bits, as well as when, why, and how to use them. Let’s take a deep dive:
Nail Bits… What Are They?
If you’re not overly familiar with them, nail bits are essentially the little “bits” that get attached to the end of a nail drill.
If you already have a nail drill of your own, quickly go and grab the one that you have – you’ll notice that the end doesn’t have anything attached to it!
The main reason for this is so that you will have the freedom to swap out nail bits from each other whenever you need them, and also ensures that you are able to easily add new nail bits into the mix, too.
Wondering where the nail drill actually came from, though? Interestingly enough, the drills that are used on acrylic nails are actually inspired by the standard work drills that are used for woodwork and other kinds of trade work.
So much so, that before nail drills were first created, many nail technicians would use a woodwork mandrel with a sanding piece attached in order to perfectly buff their artificial nails. The more you know!
Needless to say, sooner or later, the nail drill was developed specifically for use on acrylic and natural nails, and in turn, drill bits, too.
Thanks to this, it then meant that nail technician was able to begin using their nail drills for a variety of different tasks that they wouldn’t have been able to have previously done, including cleaning the cuticle, filing the edges, shaping the acrylic nails, and even effectively remove the leftover gel from the previous manicure.
To follow, even though there are many different types of nail bits on the market that come in different styles and materials, all nail bits will consist of two main compartments that are connected directly to each other, and these are known as the head and the shank area.
The longest part of a standard drill bit is the shank, which is essentially a little cylindrically-shaped pole that is attached to the head of the drill bit and designed to attach itself to the nail drill.
As a side note, it is worth keeping in mind that the shank of the nail bit will usually be either three thirds or one eighth in diameter, and both are officially recognized as being industry-standard sizes.
However, keep in mind that older generation nail drills will usually be compatible with nail drill bits that have a diameter of one eight, while newer nail drill bits will more than likely be compatible with the three third diameter drill bits.
If that sounds a little bit confusing – don’t be put off from using a drill bit!
If you’re ever unsure of what size drill bits you will need to get for your particular nail drill, then we strongly recommend that you take a look at the manual that you will have gotten upon purchasing your drill.
In there, you will find all of the necessary information regarding what drill bit sizes you will need to get for your drill, but if that fails, you can always contact your manufacturer’s customer service team and ask them for assistance on which drill bit sizes to pick up for your nail drill.
Are Nail Bits Universally Compatible With All Types Of Nail Drills?
As we have already mentioned briefly above, not all nail bits are going to be compatible with your nail drill.
The main reason for this is simply due to the fact that older generation drill bits are designed to be compatible with all drill bits that have a shaft that is 3/32 inches in diameter, while all of the newer nail drills currently on the market are designed to be compatible with all nail bits that are 1/8 inches in diameter.
Nevertheless, as we have already briefly discussed above, if you are ever feeling unsure about what size drill bits to go for and you don’t want to make a mistake and waste money, then we recommend that you either contact your nail drill’s manufacturer for assistance or refer to the owner’s manual which you will have received in the box upon purchase.
Quick Nail Drill Bits Guide: Mastering the Basics
- Nail drill bits come in various shapes and sizes, each serving a different purpose, such as removing gel polish or filing acrylic nails.
- Clean and disinfect your nail drill bits after each use to maintain their performance and prevent the spread of infections.
- Learn how to use nail drill bits with care and precision, as improper use can damage natural nails or cuticles.
- Always prioritize safety when using nail drill bits by wearing safety glasses and a dust mask to protect against dust and debris.
The Different Types Of Nail Bits

So, now that we have taken the time to talk you through where the nail drill came from and what nail bits are – we are now going to be taking the time to talk you through all of the different kinds of nail bits most commonly used by nail technicians.
As we’re sure you’re already familiar with, there are quite a few different kinds of nail bits available;e for you to use, so it’s a good idea to make sure that you’re well-acquainted with them – as well as have a greater understanding of when and when not to use them.
Let’s take a look at them below!
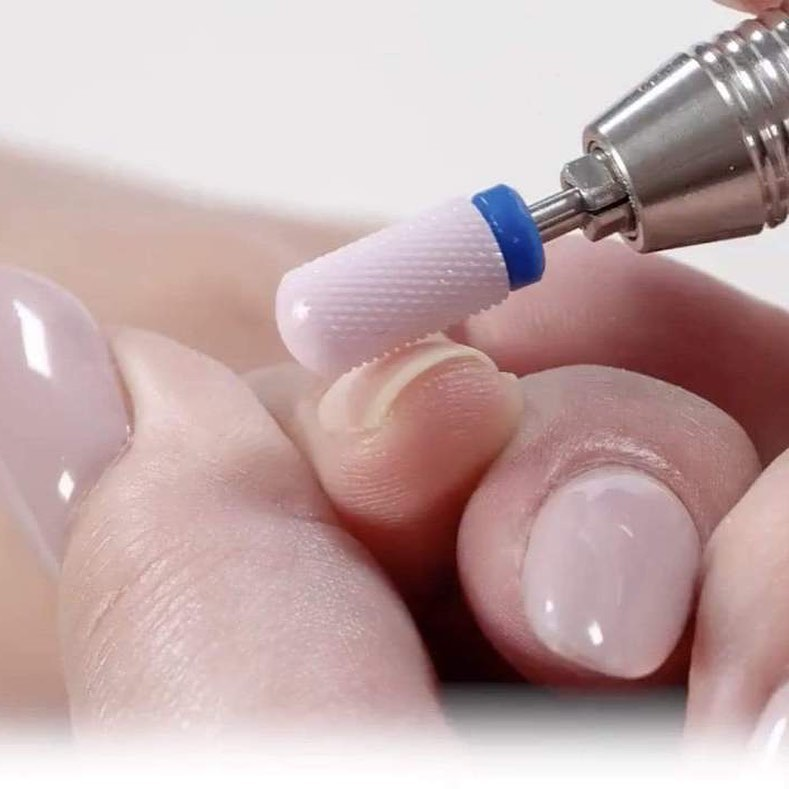
1. Mandrel + Sanding Bands

If you’re not completely familiar with nail bits, then a mandrel drill bit with an added sanding band is one of the very first nail bits that was developed by nail technicians – with the first records of it being around dating back to the 1980s.
This particular sanding band is easily distinguishable and is usually a dark brown in color thanks to the added sanding bands that wrap around the cylinder of the mandrel.
As one of the very first nail bits that were first developed by nail technicians in the 1980s, you will notice that the mandrel drill bit does not come with a metal shaft connected to the head, which means that if you wish to use it, you will need to attach it to the tip of your nail drill by simply fastening the mandrel’s head.
Unlike the other three common types of drill bits, the mandrel drill bit is still one of the most popular types of nail bits simply due to its versatility and how inexpensive they typically are in comparison to other types of nail bits available to buy.
Plus, it is also worth noting that the mandrel drill bit is extremely similar to regular nail files, which means that this particular nail drill is one of the best options for buffing up natural nails.
As a side note, even though the mandrel nail bit is one of the most popular and versatile of all nail bits, you’re likely going to find that the boards wear down far quicker than other types of drill bits.
Luckily enough, thanks to the fact that this drill bit is designed to be inexpensive, it means that you will be able to stock up on them without breaking the bank.
If you’re in need of some mandrel nail bits – then this is a great option and offers excellent value for money!
You should also note that mandrel nail bits will often come in varying levels of sanding board intensity, ranging from gentle, medium, and strong.
The gentle, fine sanding bands are specifically designed to be used on the natural nail and will be able to rough up the surface of them without causing them to become damaged.
Thanks to that, it means that when it comes to applying the acrylic, there will be a much stronger bond as the acrylic will have a bumpy, ridged surface to stick onto as opposed to a smooth surface which will likely cause lifting far more quickly.
As for the medium sanding band, even though it can be used for multiple different nail tasks it was specifically intended to be used to help get rid of any unwanted skin around the edges of the nail bed (cuticles) as well as to clean away any gel nail polish that gets stuck either underneath or around the nails during the application process.
The medium mandrel drill bits can even be used to help lift away any leftover gel polish from a previous manicure, as well as to help shape the nails after the acrylic has been applied, too.
Last but not least, the strongest mandrel nail bit is specifically intended for heavy-duty use,, and is designed to be used to shape acrylic nails after the acrylic has dried and they are ready to be tidied up and smoothed.
In some instances, these mandrel nail bits might also be used to help get rid of stubborn cuticles that won’t budge, and even to help get rid of any excess polish that won’t come off.
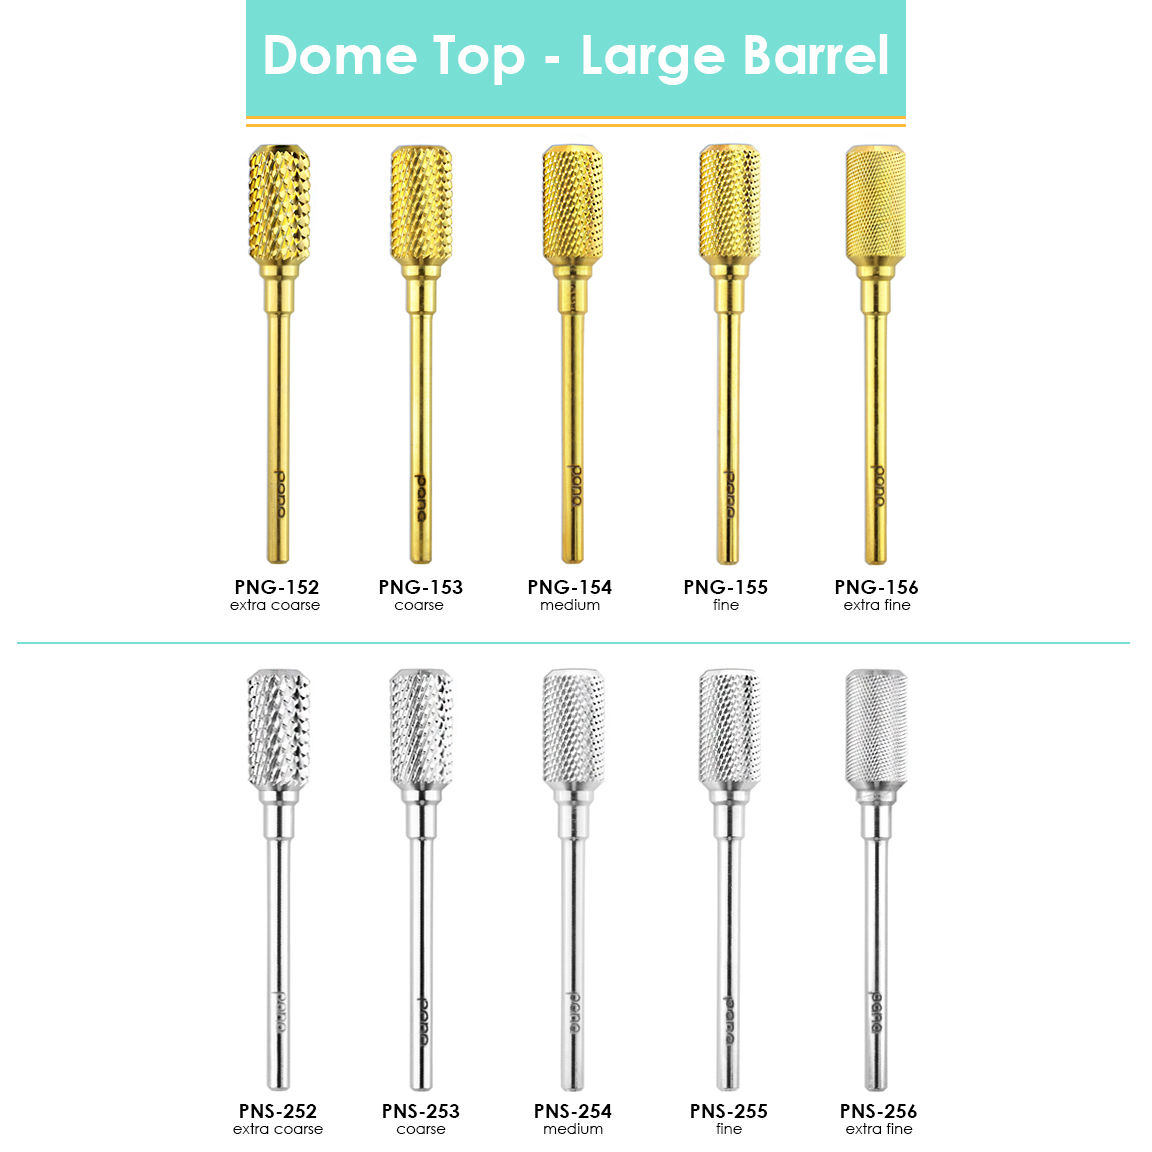
2. Barrel/Metal Nail Bits

As acrylic nails became more popular, there was room for more types of nail bits to be developed – and this is where the popular barrel nail bit was born.
Unlike the mandrel nail bit that we have just talked you through above, barrel nail bits are very similar to the mandrel style, although they are made out of higher quality materials.
These are specifically designed to offer the user more durability (as mandrel nail bits have a tendency to wear down very quickly due to it being an emery board) and are often made out of strong materials including ceramic, stainless steel, alloy steel, and even sometimes diamonds!
More often than not, barrel nail bits will usually be finished with a silver or gold coating.
Similar to mandrel nail bits, barrel nail bits come in varying levels of coarseness, which means that they can be used for a variety of different purposes.
To help you understand the main differences between the three most common types of barrel nail bits currently on the market, let’s break them all down below:
Fine/gentle barrel nail bits: The first type of barrel nail bits that you will come across are “fine” barrel bits, which are the most gentle of all three kinds.
The fine barrel nail bits are most commonly designed to be used across the tops of acrylic/artificial nails in order to help smooth them out and prepare them for the application of gel polish.
But, they can also be used to help tidy up the edges of the nails, while also being ideal for getting rid of excess cuticles, too.
Standard/medium barrel nail bits: The next type of barrel nail bits available for you to use are medium (or standard) nail bits that are slightly more coarse than fine barrel nail bits.
Unlike fine barrel nail bits which are designed to be used to help smooth out acrylic nails, medium barrel nail bits are specifically designed to be able to effectively and efficiently smooth out lumpy, ridged areas across artificial nails where the acrylic might have dried unevenly.
Keep in mind, these medium barrel nail bits are designed for use on artificial nails only, they should not be used on natural nails as they are too strong for them and could cause them to become damaged.
Thick/coarse barrel nail bits: Last but not least, the last type of barrel nail drill is the coarse nail bits, which are the thickest out of all three.
These nail bits are very coarse and sharp, which means that you should never use them on your or your client’s natural nails as they will damage them.
Instead, coarse barrel nail bits are designed to be used across the top of artificial nails to get rid of a gel manicure so that an infill can be done.
Alternatively, coarse barrel nail bits can also be used to get rid of particularly large lumps across the acrylic nails to smooth out any unevenness, as well as to quickly shape them into you or your client’s desired shape.
As a side note, if you do not like the traditionally shaped barrel nail bits, then you could alternatively decide to opt for barrel nail bits that feature rounded edges.
These help to prevent any injury to the skin or damage to the nails and are often better-suited to nail technicians working on clients, as they have a far less likely chance of causing any damage to the cuticles or surrounding skin.
3. Gold/Silver Carbide Bits
Gold Carbide Bits: These bits are coated with a layer of gold, adding an extra layer of protection against corrosion and wear.
Gold carbide bits are ideal for removing acrylic or gel nail enhancements efficiently.
Their sharp, precise design ensures minimal friction and heat generation during use, enhancing client comfort and minimizing the risk of damage to natural nails.
Silver Carbide Bits: Silver carbide bits are versatile tools for various nail tasks. They shape and refine nails, smooth rough surfaces, and clean cuticles.
The silver coating offers protection and helps prevent rust, ensuring a longer lifespan for the bits. Silver carbide bits are essential for achieving professional-quality nail treatments with ease.
Both gold and silver carbide bits are essential for nail technicians, providing the durability and precision required for creating stunning and long-lasting nail enhancements and designs while prioritizing client safety and comfort.
4. Ceramic Bits

Ceramic bits, an indispensable tool in nail care and beauty, are specialized attachments for electric nail drills.
Crafted from durable ceramic material, these bits are designed with precision and finesse to shape, refine, and maintain nails with exceptional efficiency and safety.
Known for their exceptional heat resistance, ceramic bits ensure minimal friction during operation, preventing discomfort and overheating.
They are adept at gently and precisely removing excess acrylic or gel, refining the cuticle area, and smoothing rough nail surfaces.
Their versatility makes them suitable for both natural and artificial nails.
Ceramic bits are favored by nail technicians for their longevity and ease of sterilization, ensuring hygienic use.
Whether you’re a professional nail artist or an at-home enthusiast, these reliable tools offer precise control and a smooth, polished finish, facilitating the creation of stunning nail designs and the maintenance of healthy, beautiful nails.
Keep In Mind
- Safety First: Always prioritize safety when using nail drill bits. Proper training and technique are essential to avoid injury.
- Choose the Right Bit: Select the appropriate nail drill bit for the specific task you’re performing, whether it’s filing, shaping, or removing acrylic.
- Practice and Patience: Becoming proficient with nail drill bits takes practice. Start with low speed and gradually increase as you gain confidence.
- Maintain Your Bits: Keep your drill bits clean and sanitized to prevent the buildup of debris, which can affect their performance.
- Seek Professional Advice: If you’re new to using nail drill bits, consider consulting a professional or training to ensure you use them safely and effectively.
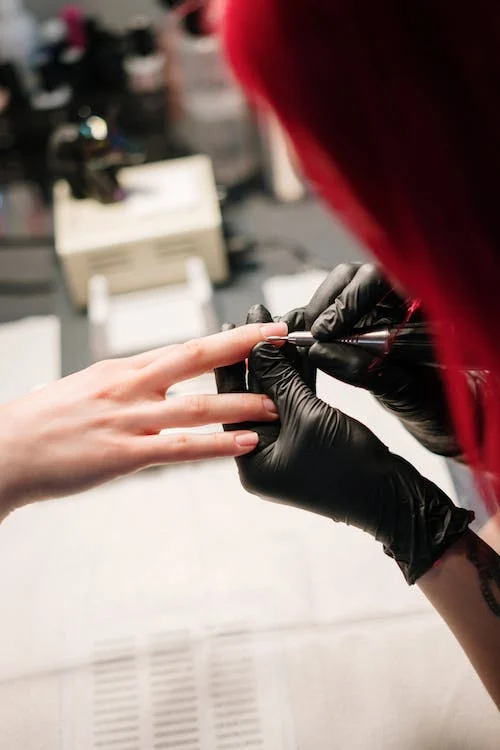
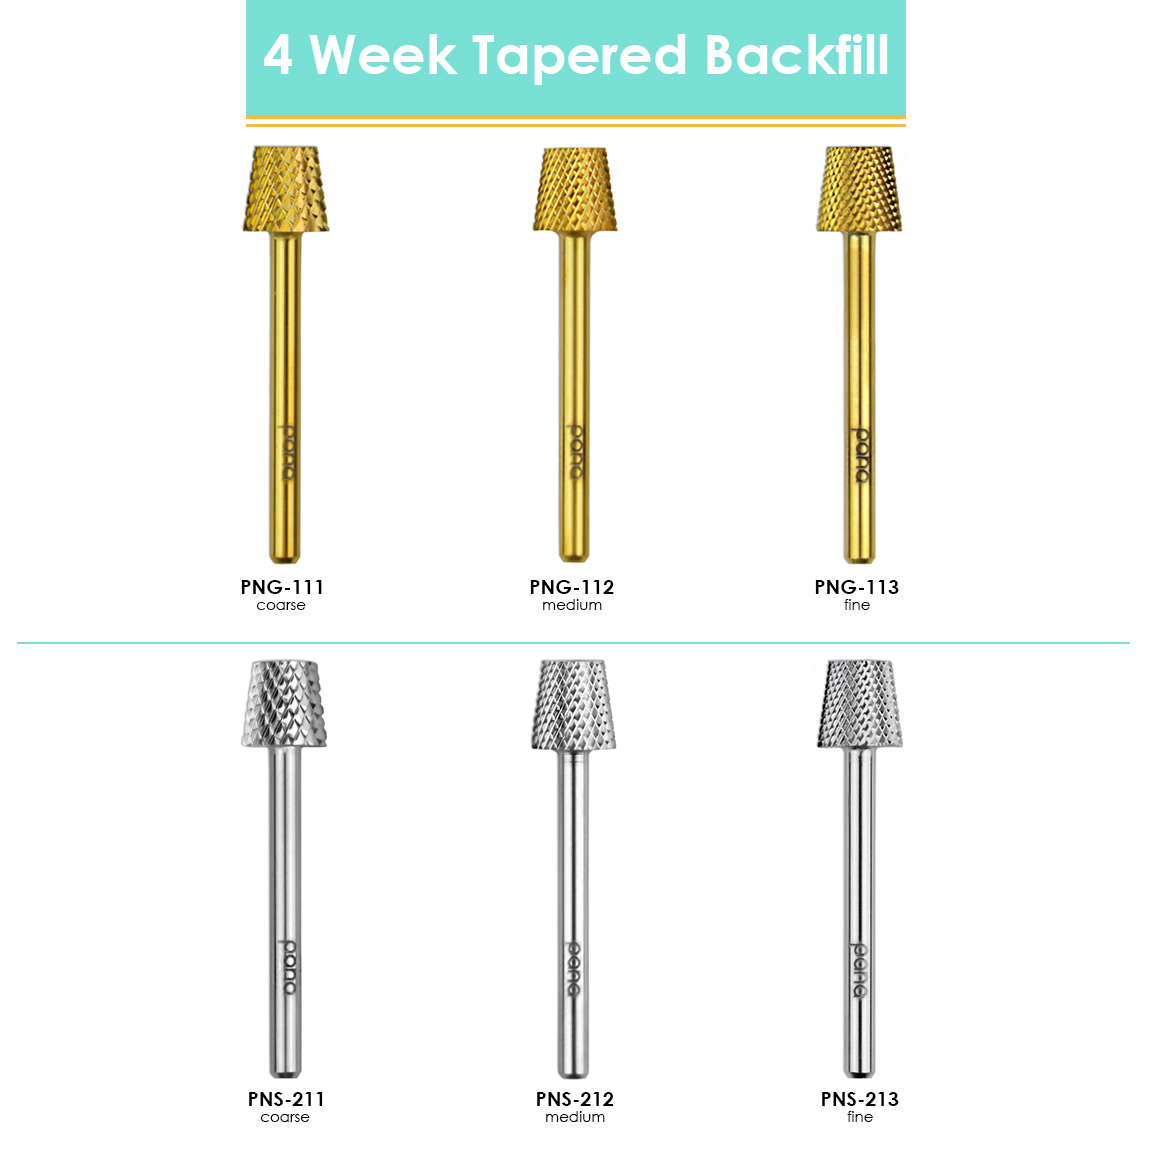
3. Cone Nail Bits

Last but certainly not least, the final most commonly used nail bits are cone nail bits, which are specifically designed to be used to help tidy up the manicure after the acrylic and polish have been applied.
Unlike the other types of drill bits that we have talked you through above that feature a thick head, cone nail bits feature a very slim, small head that is specifically designed to fit itself under the nail and around its edges to help clean and tidy the nail to achieve a professional, clean and perfect finish.
Just like their name suggests, cone nail bits will typically feature a cone-style head, although there are some cone nail bits that feature a long, slender head that is only slightly wider than the shaft area.
The Various Shapes And Applications Of Nail Drill Bits
Large and Small Barrel Bit
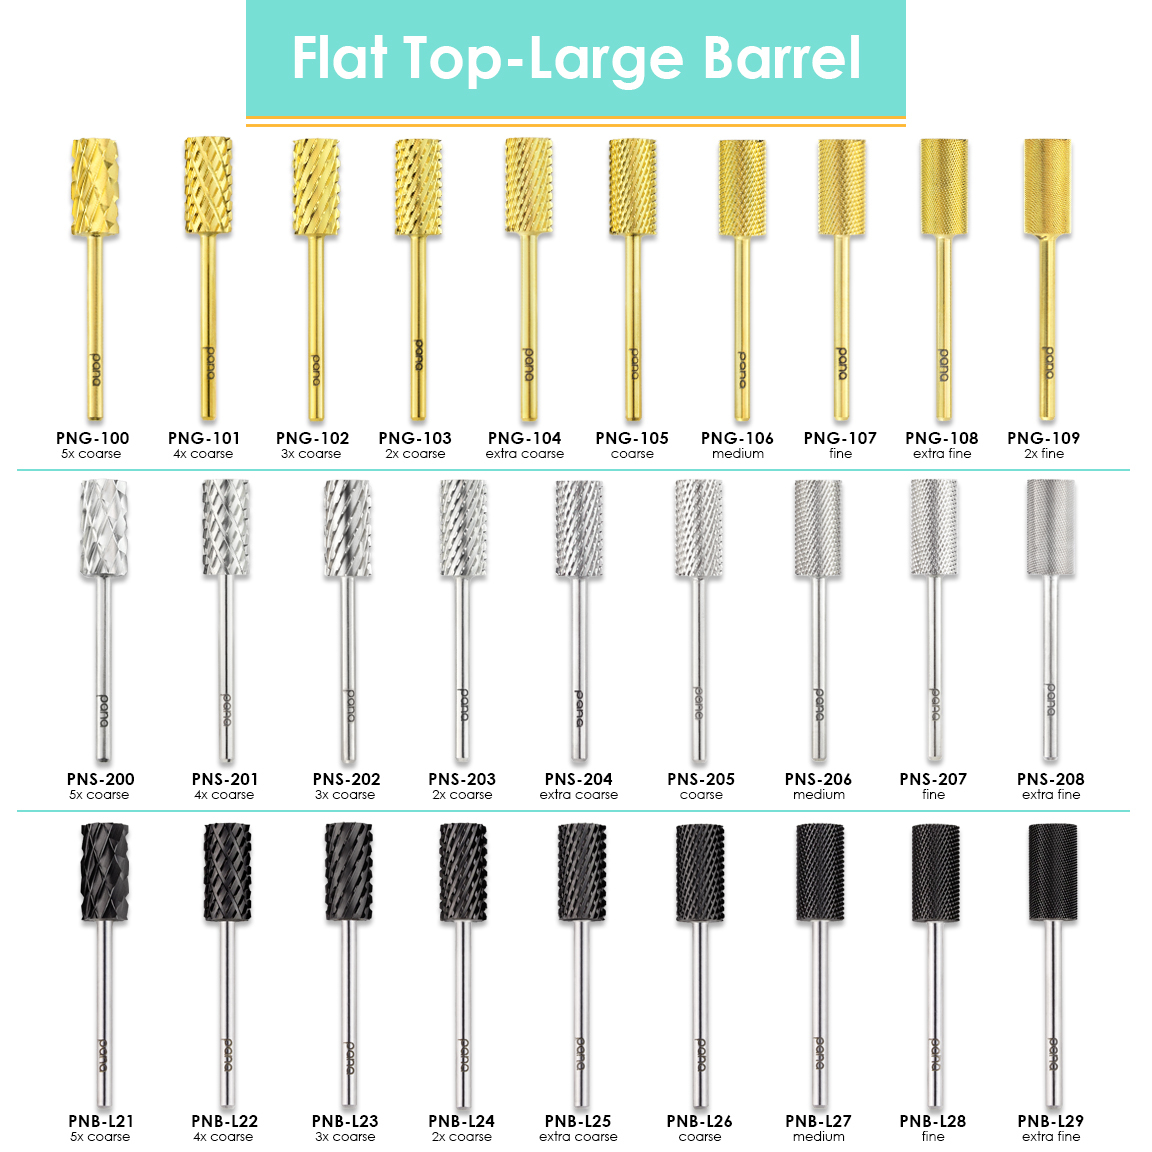
Large and small barrel bits are indispensable attachments for electric nail drills, serving diverse purposes in nail care and beauty.
The significant barrel bit features a broad, cylindrical shape, making it ideal for efficient and quick removal of acrylic or gel enhancements and for shaping and refining the surface of artificial nails.
Its size and design allow for smooth and even contouring, reducing the risk of over-filing or damage to the natural nail.
Conversely, the tiny barrel bit boasts a more compact and tapered structure, perfect for intricate detailing.
It excels in refining the cuticle area, cleaning under the nails, and precisely shaping the sidewalls.
Nail technicians and enthusiasts value its precision and versatility when creating intricate nail art or performing delicate tasks.
Large and small barrel bits are essential tools in the nail professional’s arsenal, enabling precise, efficient, and safe nail care and design, whether removing old enhancements or crafting intricate nail art with finesse.
Under the Nail Cleaning(UNC)/Needle Bit
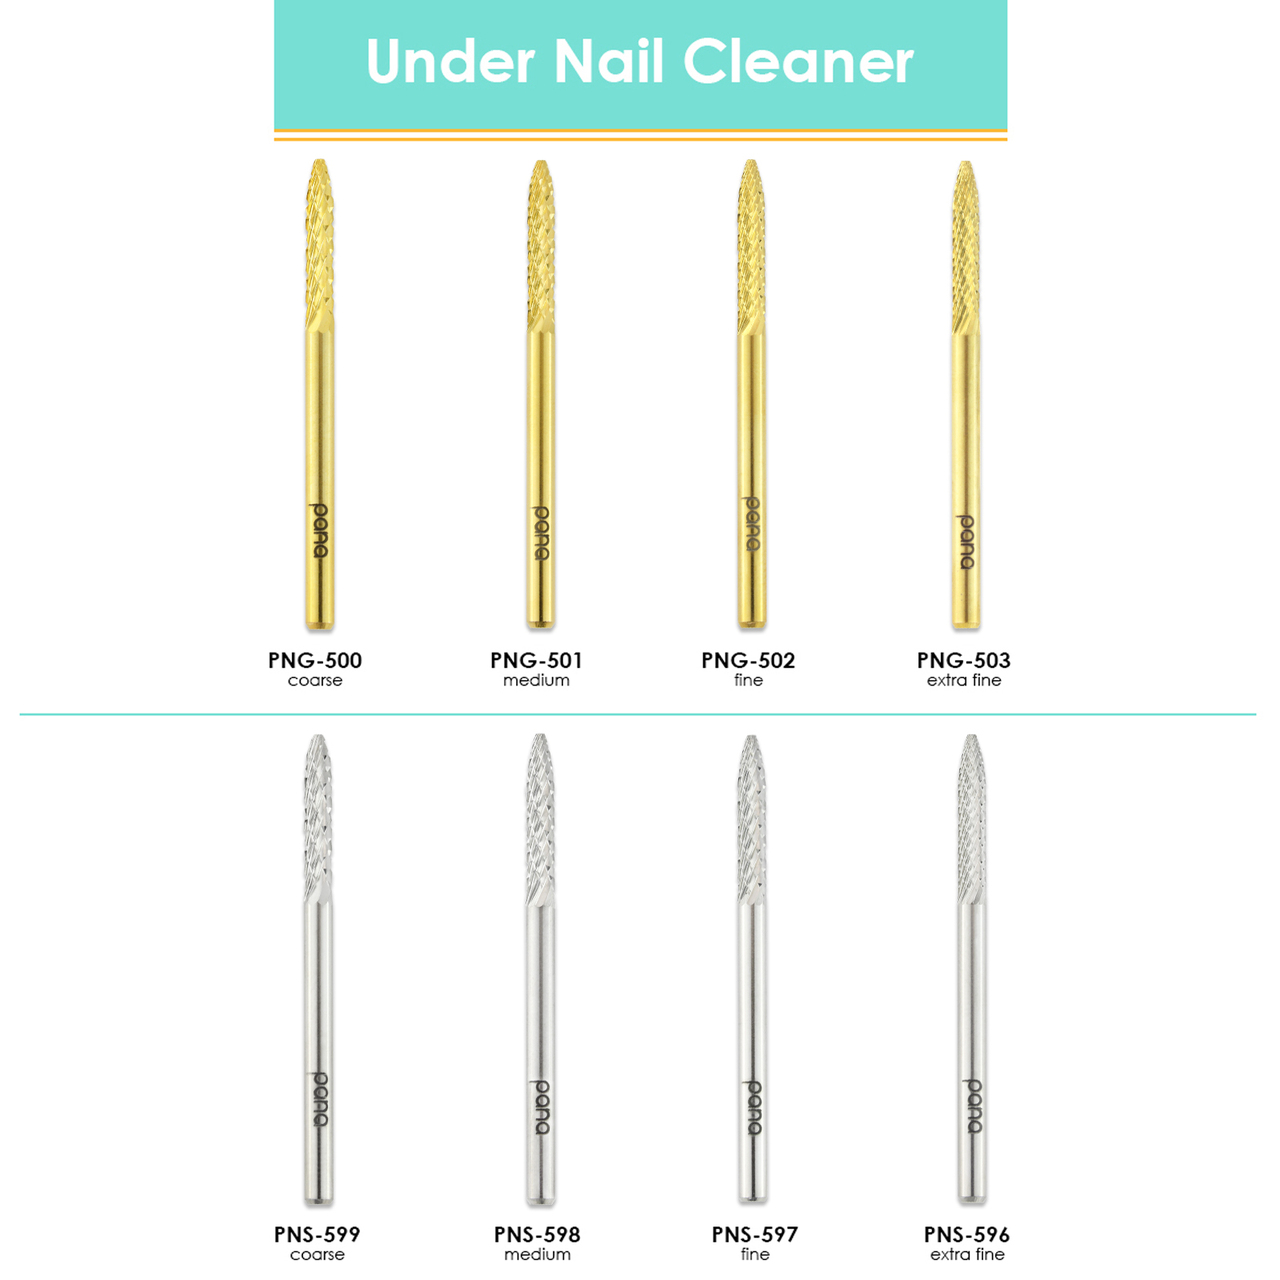
The Under the Nail Cleaning (UNC) or Needle Bit is essential in nail care and hygiene.
Designed for precision and efficiency, this specialized attachment for electric nail drills features a delicate, needle-like tip that excels at reaching tight spaces under the nail bed.
It’s ideal for gently and thoroughly cleaning out dirt, debris, and build-up that can accumulate beneath the nails, helping maintain optimal nail health and hygiene.
Professional nail technicians and individuals widely use the UNC/Needle Bit to ensure cleanliness and prevent potential nail problems.
It’s okay; the pointed tip allows for meticulous and safe cleaning, promoting nail aesthetics and overall well-being.
Cuticle Cleaner Safety Bit
A cuticle cleaner safety bit is a vital tool in nail care, designed for use with electric nail drills.
Crafted with precision and safety in mind, this bit aids in gently and effectively removing excess cuticle tissue without harming the nail bed.
Its unique design ensures minimal risk of cuts or abrasions, making it a safe option for professionals and DIY enthusiasts.
The cuticle cleaner safety bit is typically made from durable materials like ceramic or carbide, ensuring long-lasting performance.
Its versatility extends beyond cuticle care, as it can also be used for smoothing out uneven nail surfaces or removing old gel or acrylic enhancements.
This versatile tool simplifies the nail grooming process, leaving you with beautifully manicured nails while prioritizing safety and precision.
Pro Tip
Start with a low-speed setting when using nail drill bits, especially if you’re a beginner. This minimizes the risk of over-filing or damaging your nails and allows for better control.
Cone Bit
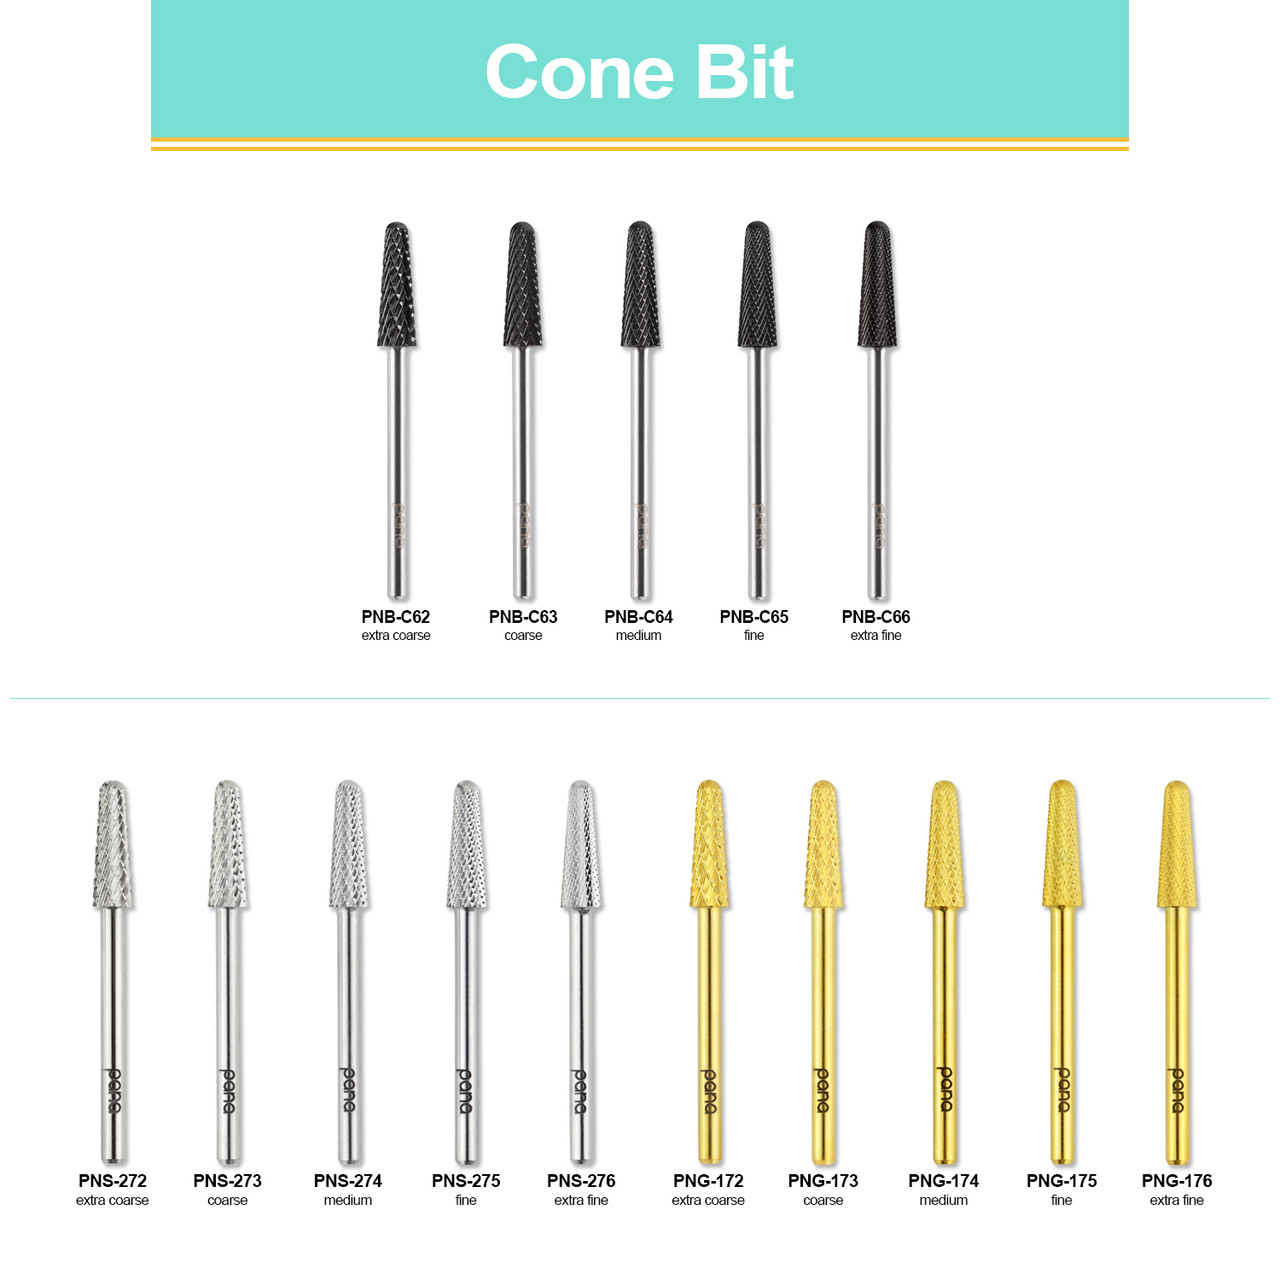
A cone bit is an essential accessory for electric nail drills, prized for its versatility in nail care and grooming.
Crafted from durable materials such as ceramic or carbide, the cone bit is a tapered, conical attachment that provides precise control and maneuverability.
This makes it ideal for various nail procedures, including cuticle cleaning, removing excess acrylic or gel, and shaping hard-to-reach areas around the sidewalls and cuticles.
Its narrow, pointed design allows for detailed work, such as refining the nail’s surface and creating intricate nail art.
Whether you’re a professional nail technician or a DIY enthusiast, a cone bit is invaluable, enabling you to achieve impeccable nail finishes and maintain healthy, beautiful nails.
Tapered Barrel
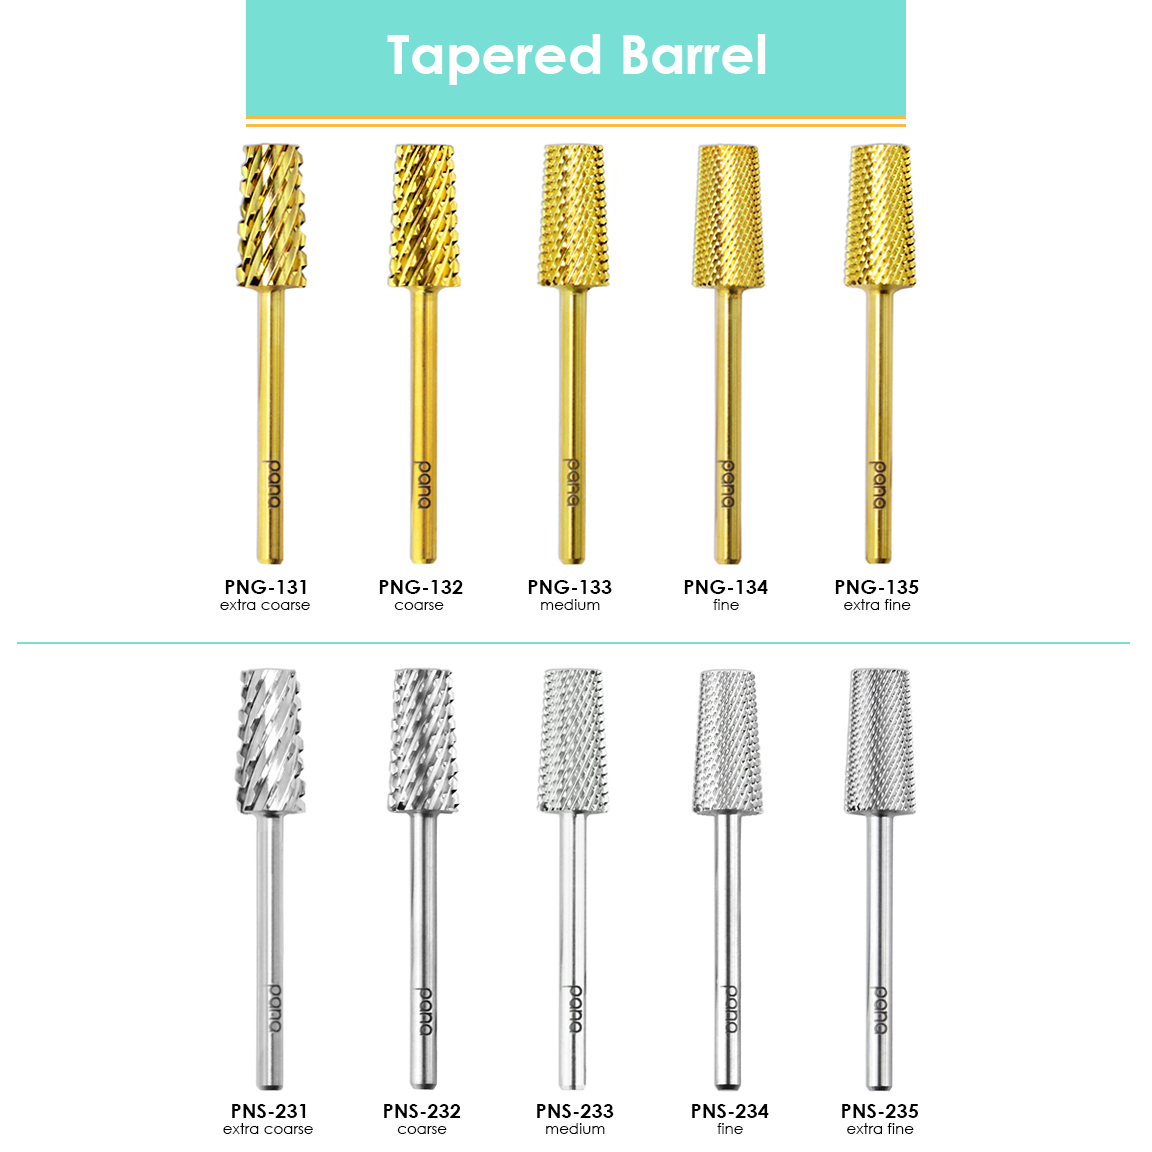
The tapered barrel, a versatile accessory for electric nail drills, is an essential tool in nail care and design.
This specialized attachment features a conical, tapering shape for precision and control. Crafted from durable materials like ceramic or metal, it excels in various nail tasks.
Its tapered design allows easy access to tight areas around the cuticles and sidewalls, making it ideal for refining nail edges, shaping extensions, and creating intricate nail art.
Nail technicians and enthusiasts appreciate its ability to smooth, shape, and sculpt with finesse, whether for natural or artificial nails.
The tapered barrel’s versatility and ease of use make it a valuable addition to any nail care toolkit, ensuring professional-quality results and endless creative possibilities.
Safety Bit

A safety bit, a critical component in nail care, is a specialized attachment for electric nail drills designed with safety as the foremost priority.
These bits are engineered to prioritize client comfort and prevent accidental skin contact or injury during nail grooming procedures.
With a unique, rounded design and smooth surface, safety bits gently and efficiently remove excess acrylic or gel, refine the cuticle area, and shape nails while minimizing the risk of harm.
Nail technicians particularly favor them for their ability to maintain a safe and controlled environment.
Whether for natural or artificial nails, safety bits provide a buffer between the drill and the skin, ensuring a secure and comfortable experience for professionals and clients.
Mandrel Bit
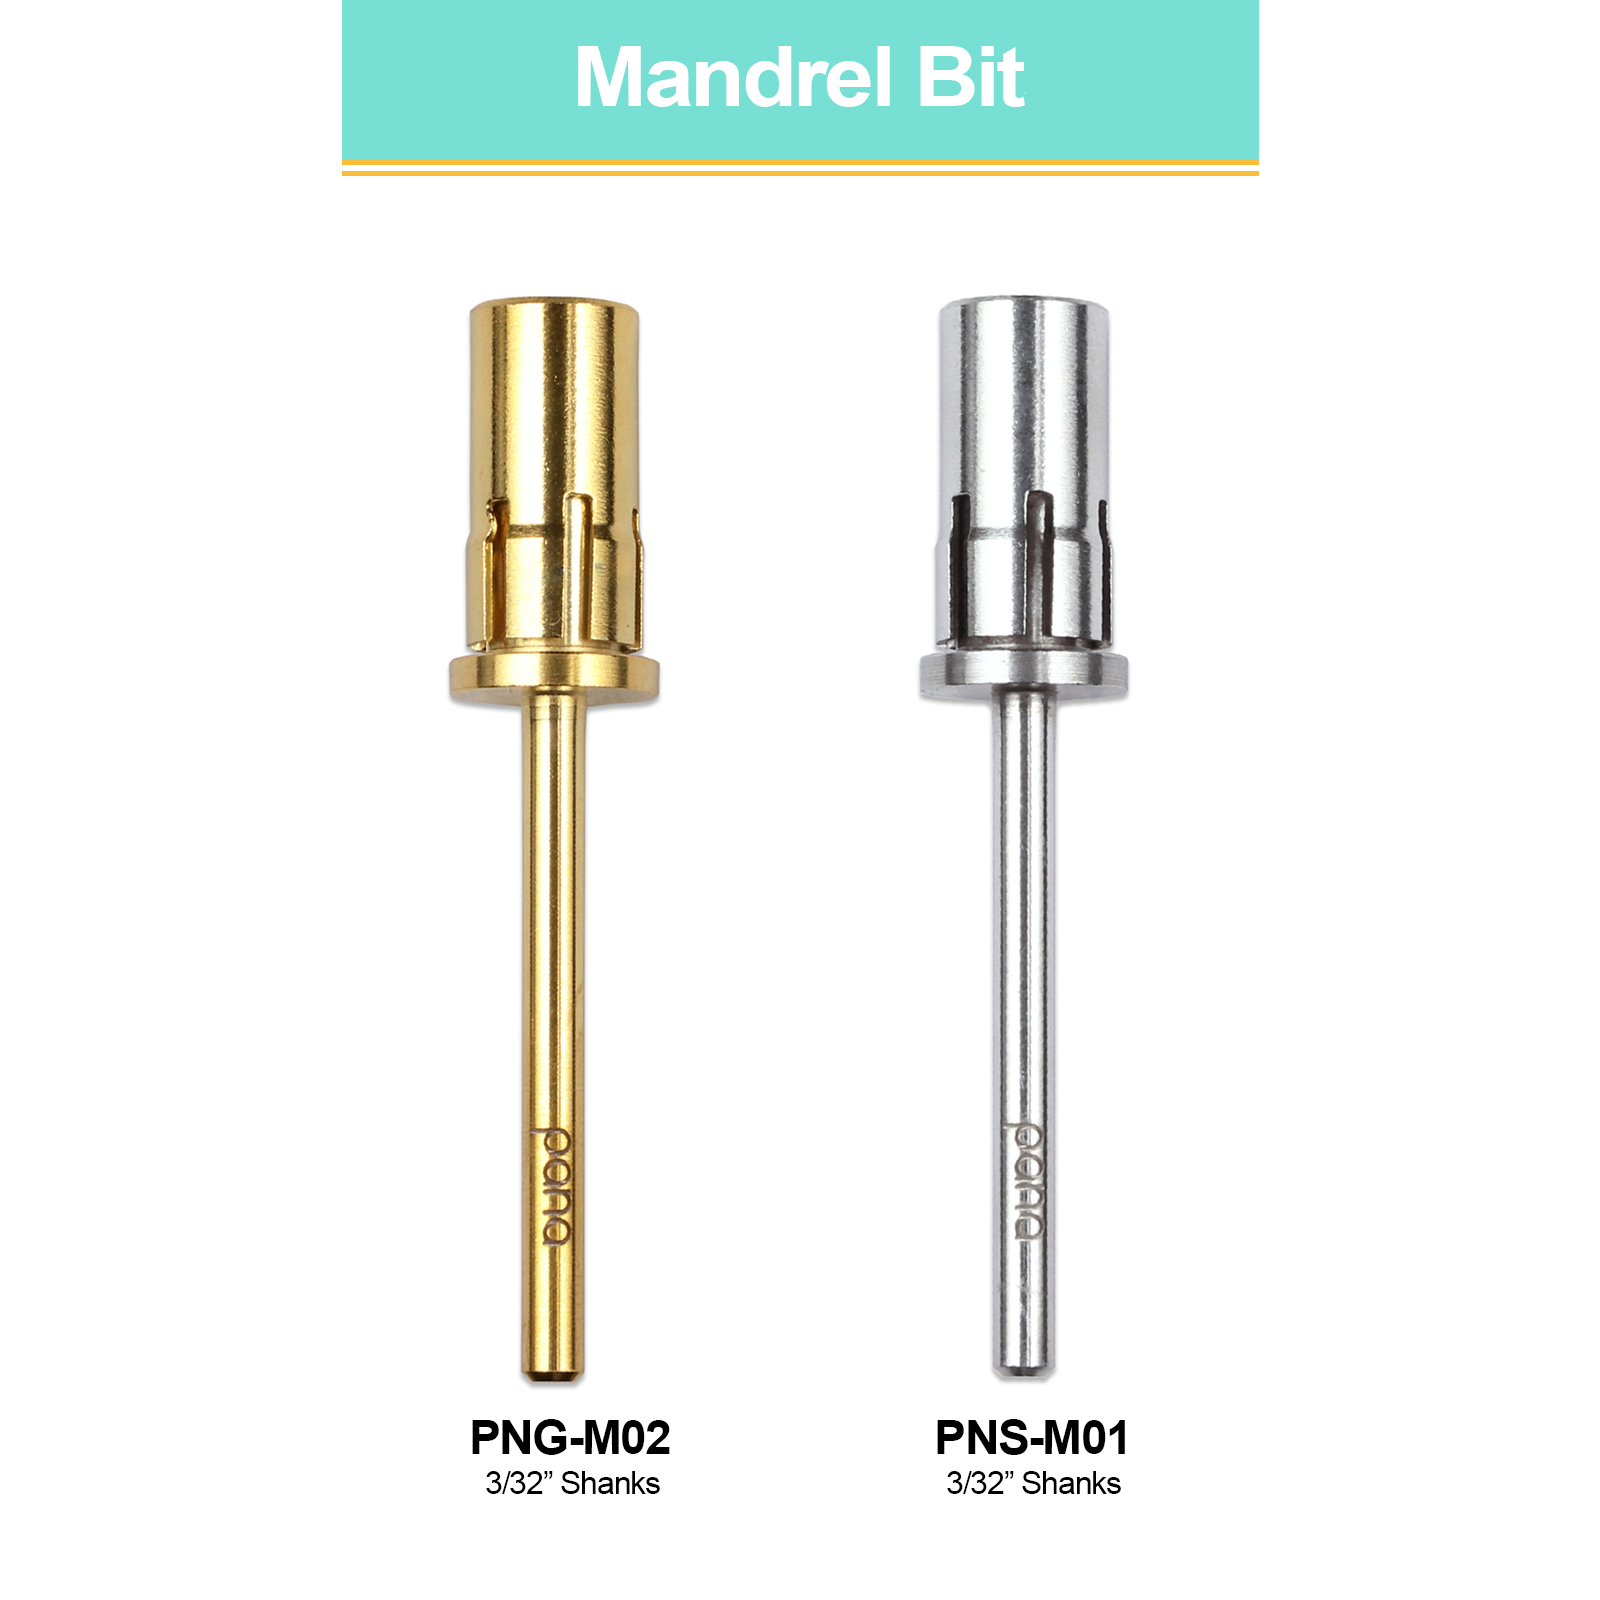
A mandrel bit is a small, cylindrical tool used in rotary tools like electric nail drills.
It is a base for attaching various abrasive or polishing attachments, allowing quick and easy interchangeability.
Mandrel bits are essential for nail technicians and hobbyists, enabling efficient nail shaping and finishing in manicures and pedicures.
Flame Bit
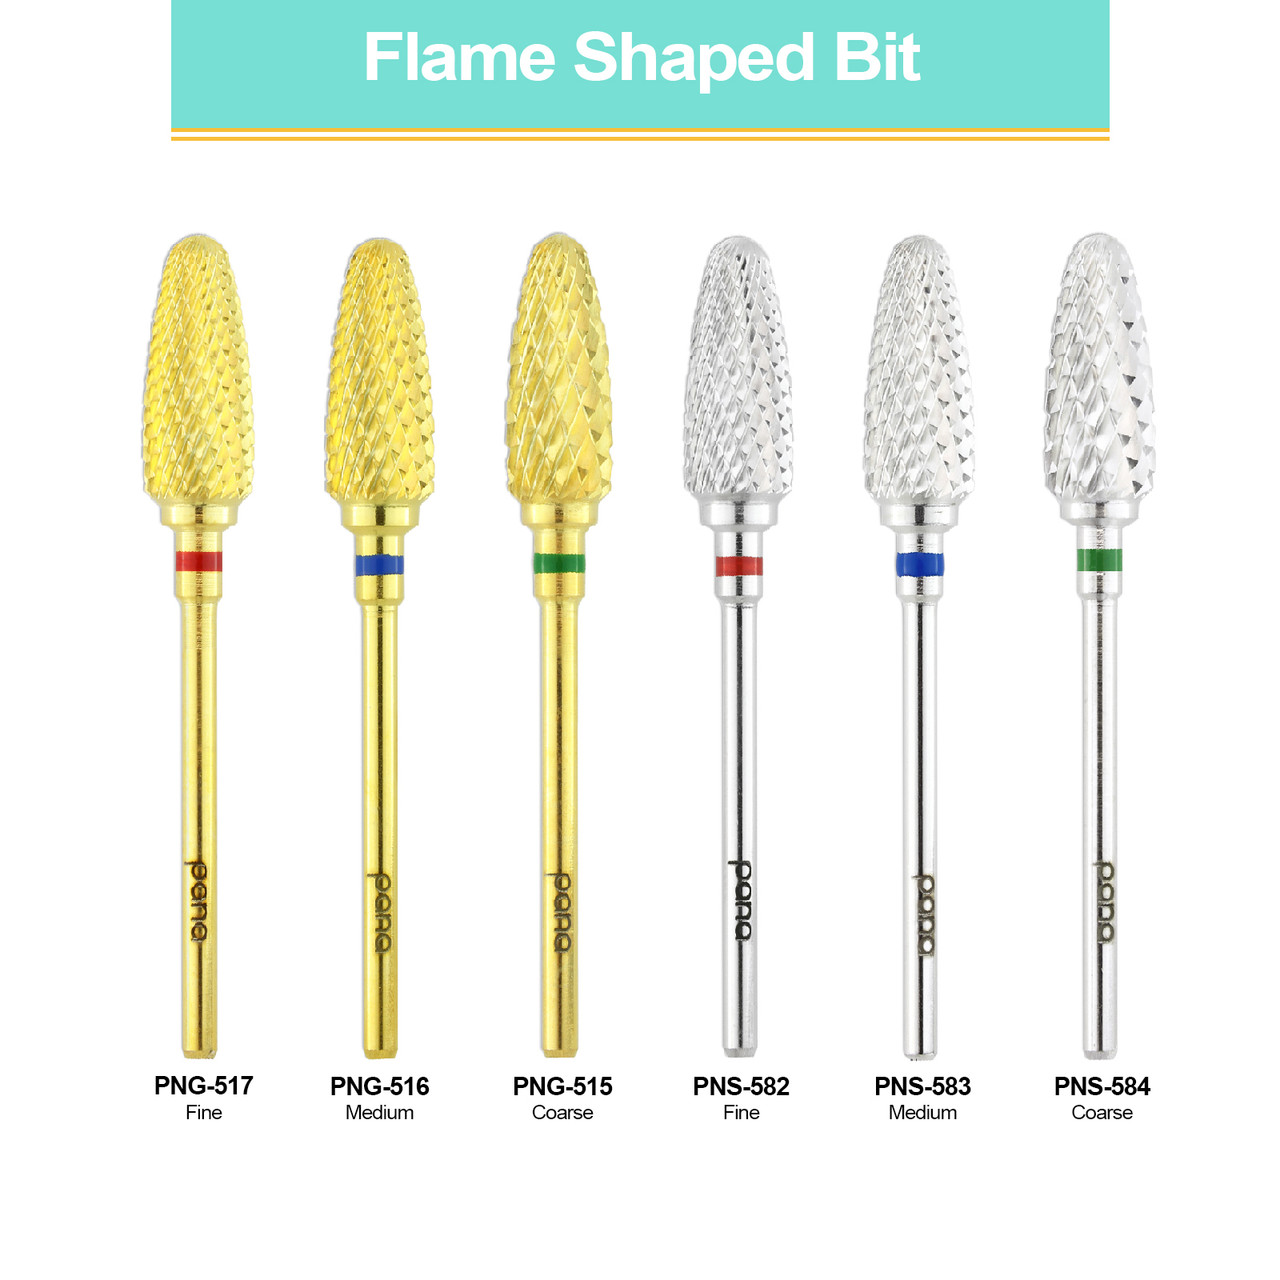
A flame bit is a specialized attachment for electric nail drills. It’s shaped like a flame and designed for precise cuticle work and nail shaping.
This tool’s unique form allows nail technicians to access tight spaces and create intricate nail art while ensuring precision and finesse during the manicure process.
Ball Shape Bit
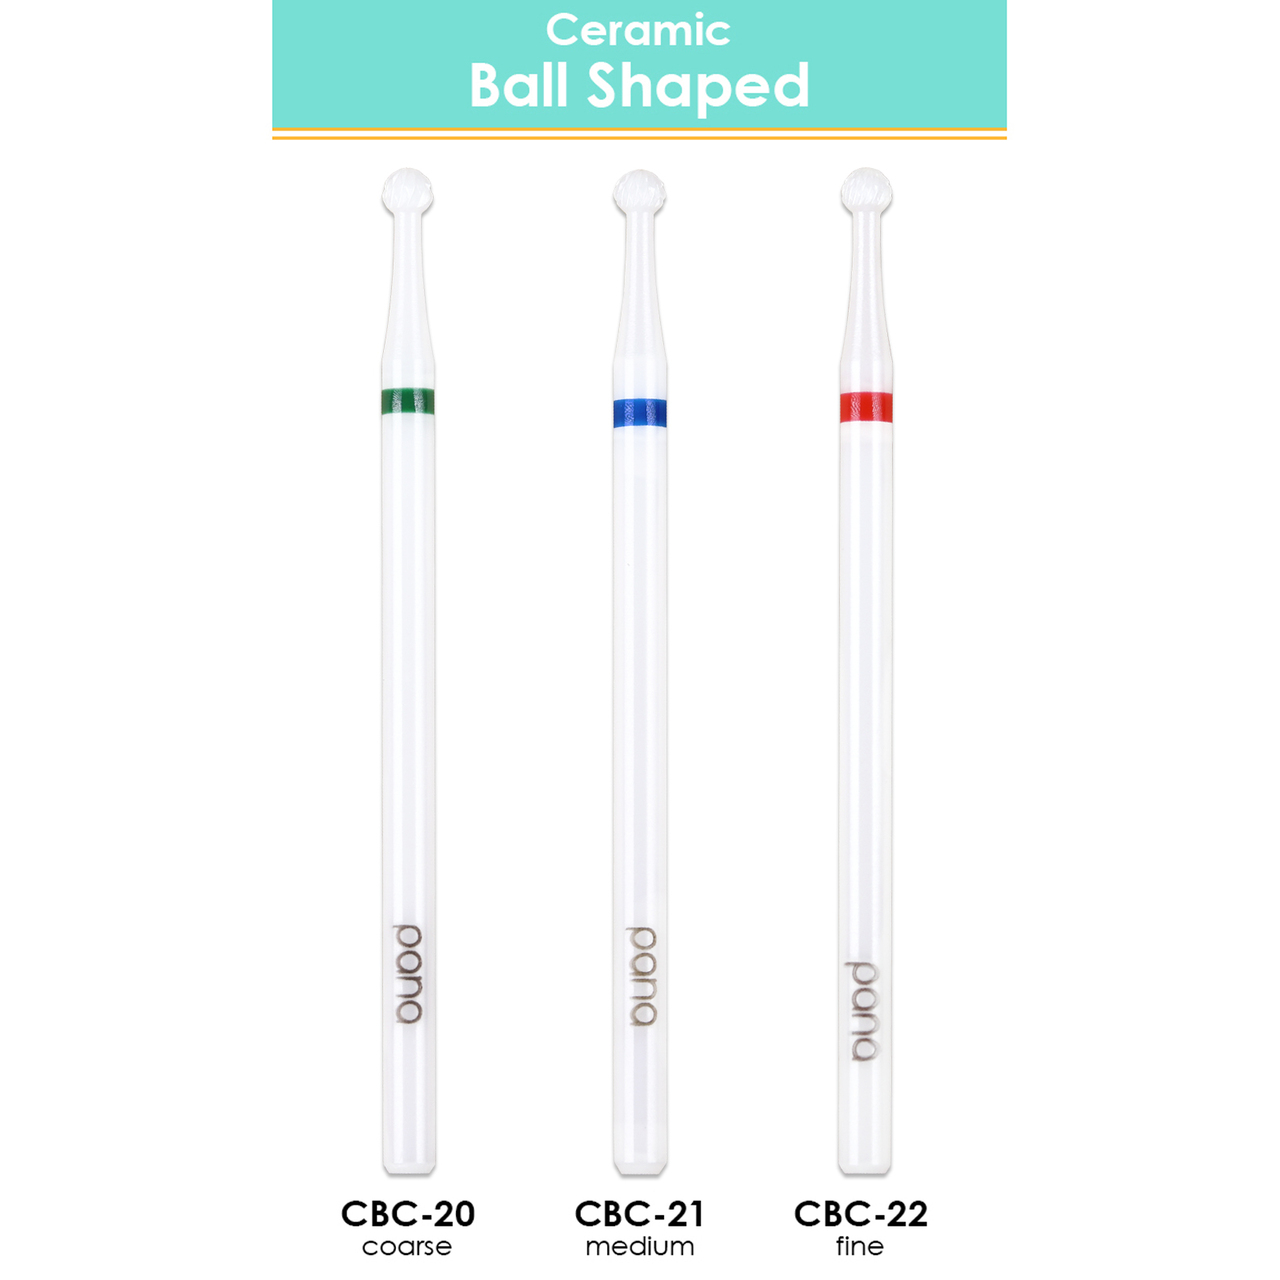
A ball-shaped bit, commonly used in nail care, is a versatile tool for nail technicians. It’s rounded and can be made from ceramic, carbide, or diamond.
This bit is perfect for removing dead skin, refining the cuticle area, and smoothing nail surfaces, ensuring a polished finish.
Maintenance/Backfill Bit
A maintenance or backfill bit is a specialized attachment for electric nail drills.
It’s designed to remove old or grown-out acrylic or gel nail products, preparing nails for a fresh application.
Its efficient and precise cutting action helps maintain the integrity and appearance of artificial nails, ensuring a clean and professional look.
Did you know?
Nail drill bits are commonly made from materials like ceramic, carbide, and diamond. Each material has unique properties and applications in nail care, offering various levels of durability and precision for different nail services.
5-in-1 Bit
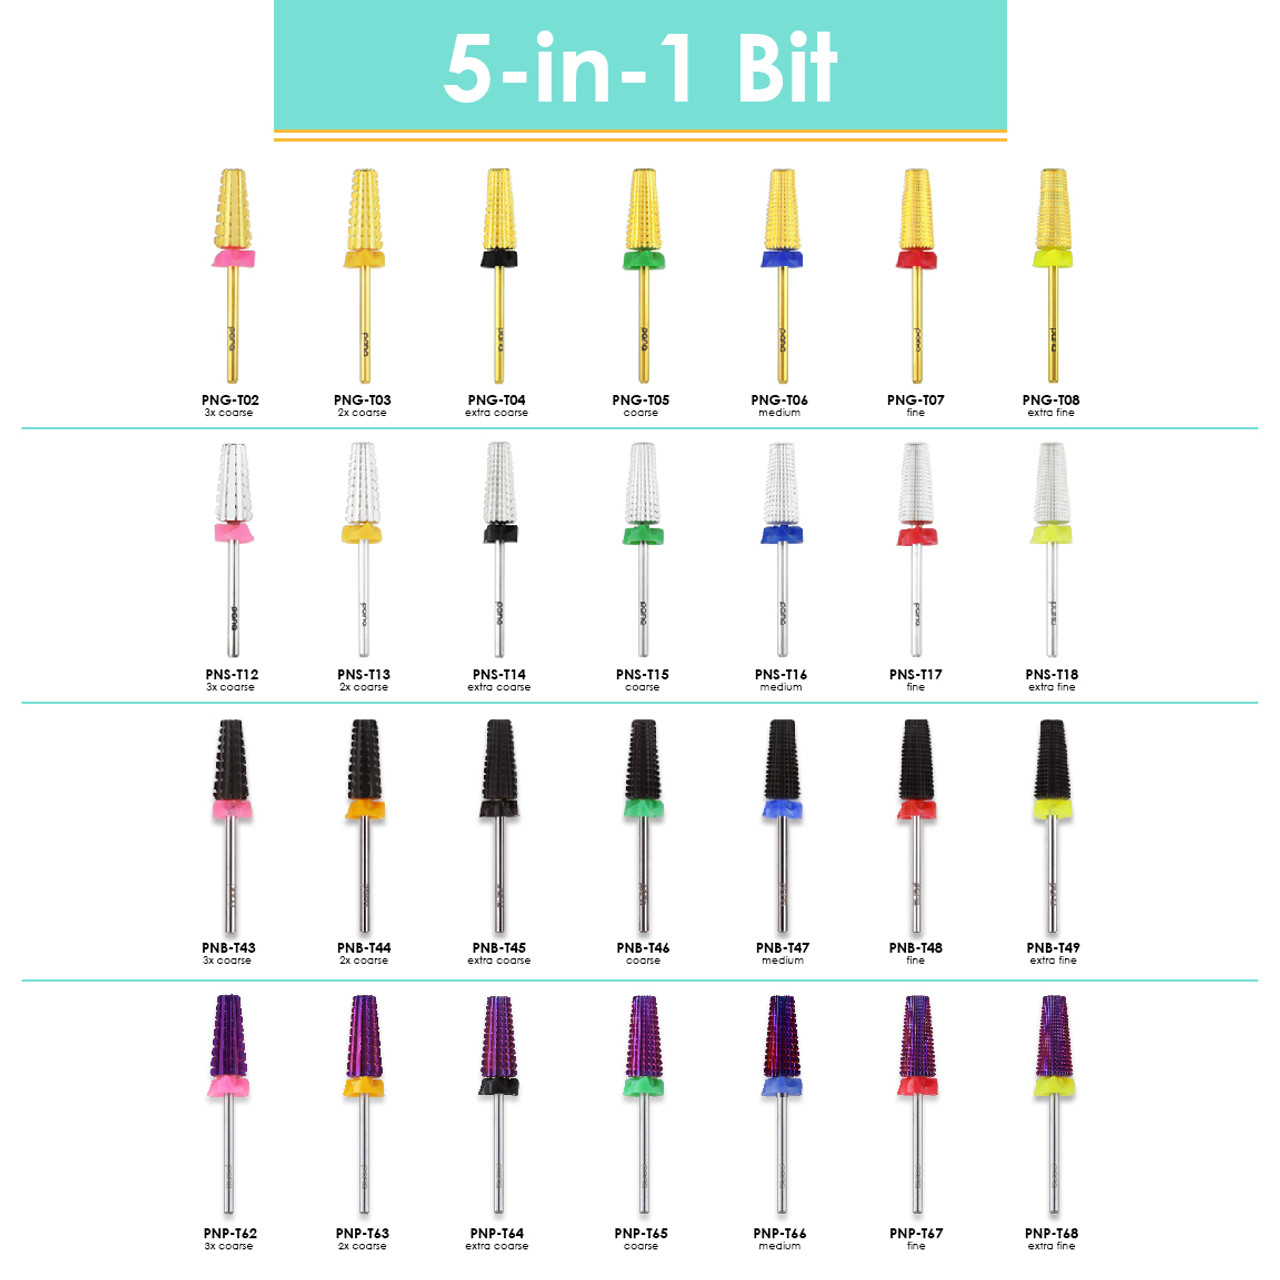
A 5-in-1 bit is a versatile tool for electric nail drills, featuring five functions in one attachment.
This multipurpose bit typically includes a top that can be flipped to access various functionalities like filing, shaping, buffing, and cuticle cleaning.
It simplifies nail preparation and maintenance, making it a valuable accessory for nail technicians and enthusiasts.
When You Should Use Your Nail Bits

Even though we’re sure that you have a much better understanding of when and when not to use the most common types of nail bits that we have talked you through above – we still think that it’s a good idea to provide you with some helpful examples of which nail drill bits are best for what.
So, let’s take a look at a few of them below:
For removing gel polish: If you want to do your or your client’s nails but first need to remove the remaining gel polish from a previous manicure, then you will first need to make sure that you have effectively removed all of the unwanted, old polish so that new polish can then be reapplied over the top.
Even though there are a variety of different drill bits that you will be able to use to achieve this, we recommend that you opt for a medium level drill bit that features a rounded edge, as this will help to ensure that you are able to remove all of the gel polish without causing any damage to the nails underneath.
Plus, thanks to the rounded edge, you will find that you are able to maintain an even, smooth surface across the entirety of each nail, especially as you will likely be needing to file away unwanted gel polish from the edges of the nails, too.
For buffing the natural nails: If you are in need of buffing the natural nails and want to make sure that you don’t damage them, then we recommend that you use a gentle mandrel nail bit.
Alternatively, if you want to be extra careful, you could always opt to use a regular, basic emery board, as this will ensure you are able to be in complete control of how much pressure you are putting on your natural nails.
For acrylic nails: When it comes to shaping acrylic nails, there are plenty of options available to you to choose from.
As acrylic nails are tougher than natural nails, it means that alongside using all three kinds of mandrel nail bits, you could also opt to use metal nail drills, too.
However, when it comes to shaping, we recommend that you use a medium-level nail drill, as this will ensure that you are able to effectively shape the acrylic nails without filing them down too far or causing a painful burning sensation.
On the flip side, if you need to get rid of any unwanted bumps or ridges to help smooth out the nails from an uneven acrylic application, we recommend opting for a sharper nail drill bit, such as a coarse metal drill bit.
Nail Drill Bits Safety Tips

As we have already mentioned above, it is very important to make sure that you are using your nail drill and bits safely with the proper techniques, as it is very easy to cause damage to the natural nails if you use them incorrectly.
If you have already undertaken a nail drill course, then you will be able to apply all of the helpful tips we share with you below alongside all of the knowledge you will have gained from the course.
If you haven’t taken a course on how to use a nail drill properly, then you will be able to safely use a drill bit with the tips we share below.
However, we still recommend that you consider doing a nail drill course, as this will ensure that you are able to use a nail drill properly and safely with the proper technique.
Like we have mentioned above, a nail drill can be dangerous if not used correctly, and is most commonly used by professional nail technicians who have many years of experience.
1. Use a slow speed around the cuticle and across the natural nail: When you are using a nail drill across your natural nails, you will need to make sure that you are using a sandboard mandrel (preferably one that isn’t overly coarse) and to ensure that you are using your nail drill on a very slow speed.
This will help to ensure that you do not damage your natural nails, while also making sure that the surface of them has been gently buffed to help increase the bonding between the natural nails and the acrylic that gets applied over the top of them.
In addition to that, you will also need to make sure that you are using a slow speed on your cuticles, as your cuticles are very thin naturally, which means that if they are ripped too much, it could cause a lot of pain, bleeding and potentially even open the door to infection, too.
2. One of the most important things that you should ensure you do while filing is to file in a downward motion. This will help to prevent any acrylic nail from shooting in an upwards direction.
3. Make sure that you wear protective goggles while using the file, as this will help to lower the chances of your eyes becoming damaged from any bits of acrylic, dust, and other debris that comes away from the nail as you are filing.
How To Practice Using Your Drill Bits
If you’d like to do some practice before using your drill bits, then we recommend taking the time to get used to holding your nail drill first.
For the best results, you will need to hold your nail drill in the same way that you would a pen, as this will ensure that you have free range of motion while using the nail drill.
After you are comfortable holding a nail drill, we then recommend that you spend some time practicing between all of the different nail drill speeds, as this will help you to become familiarized with how fast and slow you can make the nail drill go.
The more that you practice, the more confident you will feel, and the more control that you will have.
Alongside the above, if you’re not yet feeling brave enough to use your drill on you or a client’s nails, then we recommend that you use a dummy hand which will provide you with the opportunity to use your nail drill without worry.
If you’re interested in trying this method out and don’t yet have a dummy hand to use, then we recommend that you check out this one.
To start off, switch on your nail drill and see how each nail drill feels once it has been attached to your nail drill.
Once you’re familiar with the different nail bits, begin moving your nail drill side to side, and emulate “filing” the nail by gently rotating the drill bit from side to side.
Keep practicing this, making sure to adjust speeds, until you are ready to use your nail drill and drill bits for real.
How To Care For Your Drill Bits
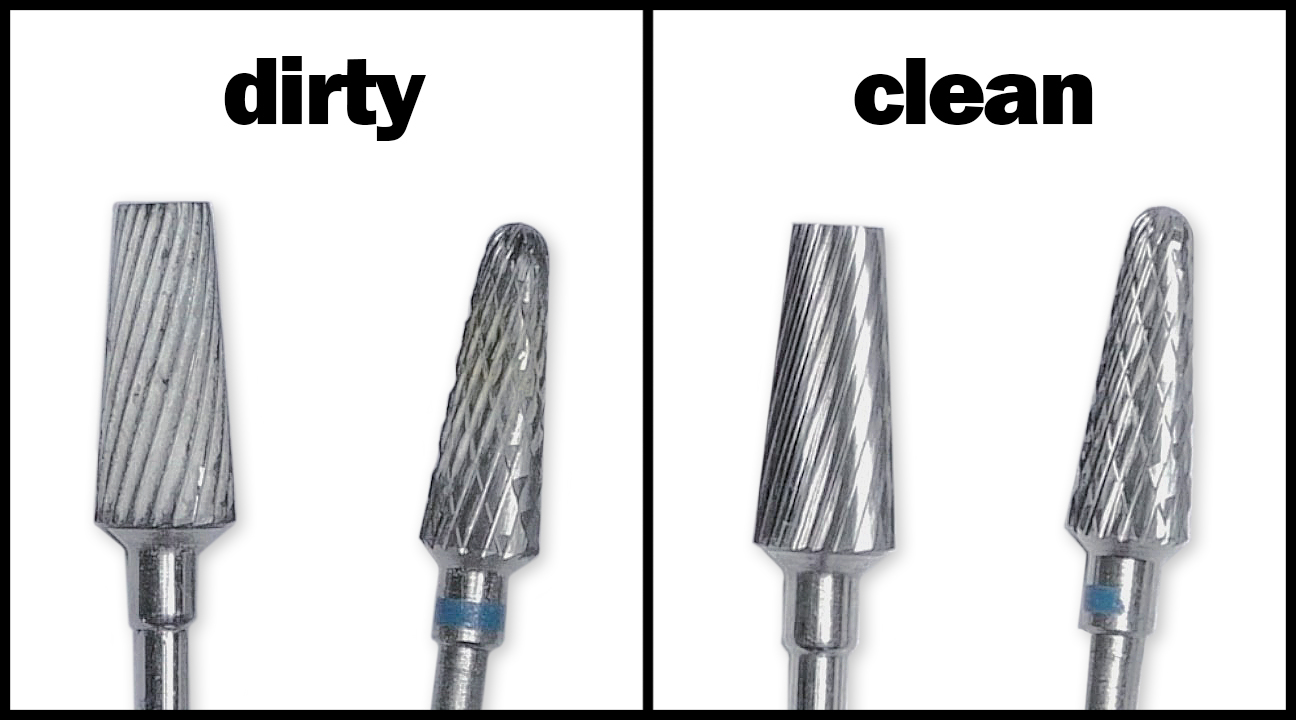
- After each use, you should take a q-tip and gently clean away any leftover nail/gel polish.
- Use a disinfectant (or water and soap) to clean the drill bits after use.
- Keep them in a bag or container.

- 25 Anime Makeup Looks To Help You Discover The Enchanting World Of Anime Makeup in 2025 - September 22, 2023
- 41 Toe-Tastic Toe Nail Designs For Every Season - September 21, 2023
- 75 Dazzling Extensions Of Glamorous Acrylic Nail Designs To Rock Unique Looks - September 20, 2023