- The Gelly Sandwiching Technique is a popular method in nail art that allows for stunning, multi-dimensional designs.
- This technique involves layering a translucent or semi-sheer color between two layers of transparent or jelly nail polish.
- The result is a beautiful, ethereal effect with a subtle color shift that resembles stained glass or watercolor.
- The Gelly Sandwiching Technique is versatile and can be used to create various nail art designs, from soft and delicate to bold and vibrant.
The Gelly Sandwiching Technique is when both gel polish and regular nail polish are used together.
While it is advised that you use all gel products together, you can use a regular polish to create the colored layer of the nail enhancement or the middle layer.
The regular polish comprises the middle layer of this sandwich and is then surrounded by a gel polish base coat and a gel polish top coat, making up the outer layers of gel that sandwich in the regular nail polish.

The gelly sandwiching technique is useful if you have a favorite regular nail polish but want a more durable and long lasting manicure.
This technique is only for at home use as most salons will strictly only use gel polishes when applying gel nails or regular nail polish when applying a regular manicure.
This technique is simple once you have the right tools and understand the correct technique. Below we list what you need to get started as well as the basic guidelines of the gelly sandwiching technique.
Tools
As you will be using both the gel and regular nail products you will need a number of tools to get the perfect nails every time.

- UV or LED Lamp – this is used to cure the gel polishes
- Nail Fan – this is to dry the regular nail polish quicker but it is not essential in your tool kit
- Gel Polish Base and Top Coat
- Regular Nail Polish in your chosen color
- Nail Scissors or Clippers
- Nail File
- Nail Buffer
- Cuticle Oil
- Cuticle Stick
- Cotton Pads
- Cotton Buds
- Acetone
- Sunscreen – to protect your hands from the UV light
Preparation
Before applying your manicure it is important to set up your area as well as prep your nails for the products. Follow the preparation steps below for a stress-free application.
- Choose where you will apply your manicure. You will need a flat surface and a chair.
- Sanitize your chosen area.
- Wash your hands thoroughly before handling your tools and also get rid of any dirt that may be under your nails.
- Apply sunscreen to the hands to prevent UV damage to the skin.
- Set up your area, lay out your needed polishes, tools and plug in your UV light and Nail Fan for ease of use when your nails are wet.
- Cut your nails so that they are all an even length. File the nail for a smooth edged finish, this will help to avoid your nail catching or tearing.
- Apply cuticle oil and massage into the skin. Take your cuticle stick and push back your cuticles. Wipe away any excess oil using a cotton pad with acetone.
- Buff the nails from edge to edge to get rid of any excess oils and also to roughen the surface of your nail so that your gel base coat will cling to the nail better, preventing peeling.
Now that your area is ready and your nails are prepped it is time to move onto the fun part – painting your nails.
Before You Get Started
- Collect the necessary nail products, including clear gel polish, colored gel polish, and a UV or LED lamp.
- Familiarize yourself with the technique on nail tips or practice nails before attempting it on your natural nails.
- Understand the process of applying colored layers with clear gel polish in between.
- Be aware of the recommended curing times for each gel layer using the UV or LED lamp.
- Finish with a topcoat for a glossy and protective finish.
The Gelly Sandwiching Technique
This technique may sound intimidating but it is a lot simpler than applying all gel products to the nails. Regular polish is easier to work with as it is a lighter product than gel polishes.

- Apply a gel base coat to the nails, place under the UV or LED lamp to cure. Check your lamps manual for information on how long you should hold your nails under the light to cure, most lamps take 30 seconds to cure base coats of gel polish.
- Apply a thin layer of regular nail polish. Allow to fully dry before applying a second coat. Using a nail fan is advised to speed up the process. Thin coats should be applied to avoid smudging and will also assist with speeding up the drying process.
- Apply a gel top coat to the nails, place under the UV or LED lamp to cure. The curing process for top coats is usually longer than for any other layer of gel polish. Check your lamps manual for specific instructions on how long this cure may take, often it can be between one to two minutes.
Some gel polishes may not require a UV or LED lamp to cure, if this is the case with the products you are using the gelly sandwiching technique will differ slightly. See the steps below.
- Apply a gel base coat to the nails, place your nails under a nail fan to dry. Drying should take approximately one minute, check your product’s instruction manual for more information regarding drying times.
- Apply a thin layer of regular nail polish. Allow to fully dry before applying a second coat. Using a nail fan is advised to speed up the process. Thin coats should be applied to avoid smudging or bubbles.
- Apply a gel top coat to the nails, place your nails under the nail fan one final time for drying. The top coat may take longer to try than previous coats, this will be specified in the nail fans accompanying manual if it is necessary.
Both UV cured and non-UV cured gel polishes will create a durable manicure, however, UV cured gel polishes may last slightly longer. If you are conscious of your health non-UV cured gel polishes are a fantastic alternative and still give you that gel manicure, professional look.
Keep in Mind
- Layering Precision: Apply colored gel layers evenly and precisely, leaving space for the clear gel layers.
- Curing Times: Pay attention to the recommended curing times for each gel layer to ensure proper adhesion and durability.
- Clear Gel Thickness: Maintain consistent thickness when applying clear gel layers to achieve the desired 3D effect.
- Experiment and Explore: Get creative with color combinations, glitters, and textures to craft unique and captivating nail designs.
- Topcoat Finish: Seal your Gelly Sandwich nail art with a topcoat for a glossy and long-lasting finish that enhances the 3D effect.
Gelly Sandwiching Technique At Home
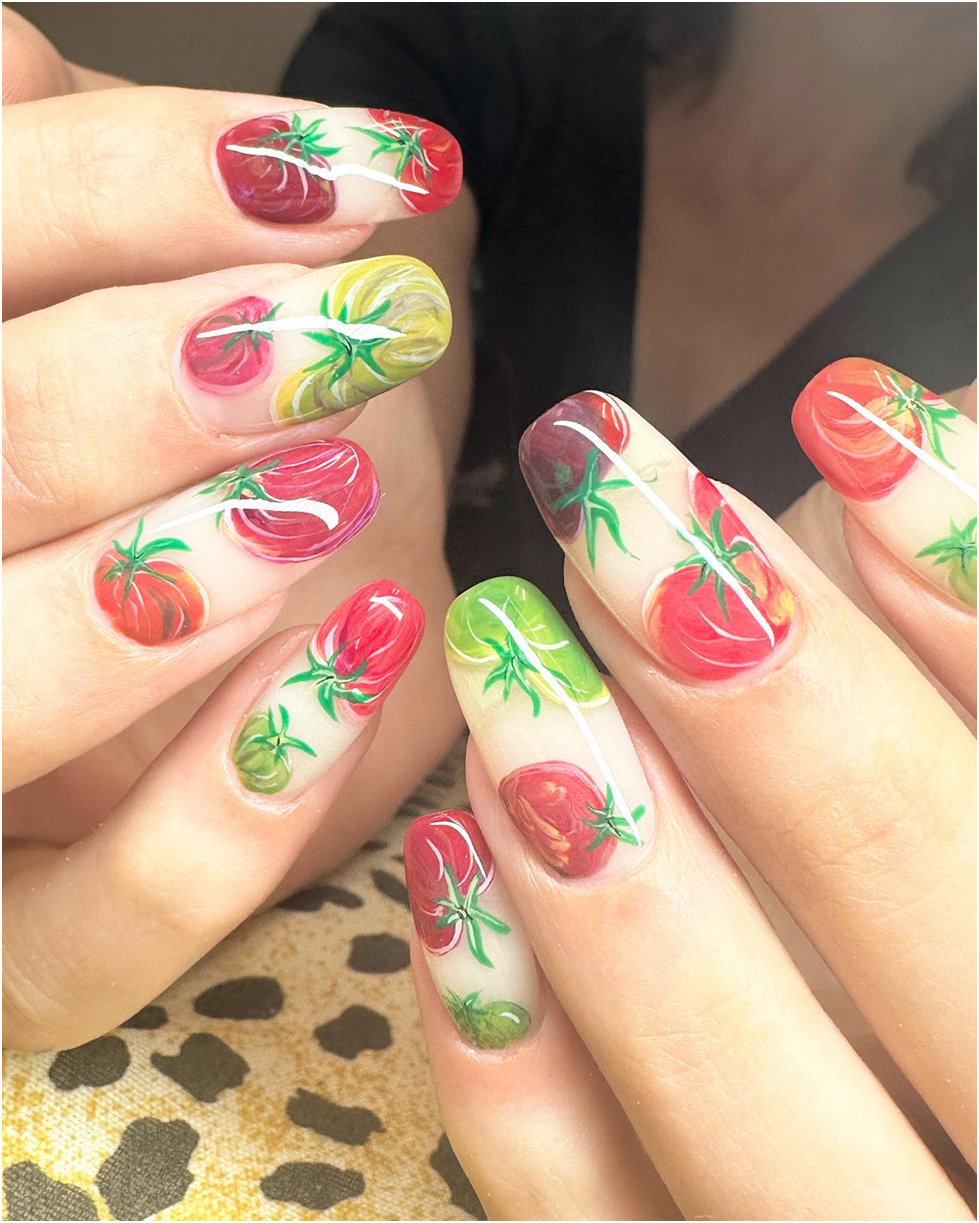
Image by @ jenilea via Instagram
The Gelly Sandwiching Technique, a popular nail art method, can be achieved easily at home, allowing you to create stunning and long-lasting manicures.
Start by prepping your nails with shaping and buffing, ensuring they’re clean and dry. Apply a thin layer of gel base coat to promote adhesion and cure it under a UV or LED nail lamp.
Then, apply your first layer of gel nail polish in your chosen color and cure it. The unique aspect of this technique comes next as you can freely apply traditional nail polish to create your desired design, from intricate patterns to solid colors, and allow it to air dry completely.
Afterward, add a second layer of gel polish to “sandwich” the traditional polish, providing protection and durability, and cure it under the lamp.
Finish with a gel topcoat for extra shine and protection, remove any sticky residue, and moisturize your nails.
This method blends the best of both gel and traditional polish, resulting in a fantastic, professional-looking manicure right in the comfort of your home.
Quick Gelly Sandwiching Technique Guide:
- Technique Overview: The Gelly Sandwiching Technique involves layering clear gel polish between colored gel layers for a multidimensional effect.
- Level Of Skill Required: Intermediate
- Suitable For: Nail art enthusiasts looking to add depth and dimension to their manicures.
- Looks Best With: Experiment with various colors and finishes to create unique, eye-catching nail designs.
How To Make Your Nails Last Longer
The below tips will help you to get the most out of your nails.
- Apply cuticle oil every second day and nail oil once a week. This will help to maintain nail hydration and prevent any breakage or peeling.
- Avoid soaking your nails in hot water for extended periods of time as this will cause your nails to swell and contract which will lead to the gel products peeling.
- Apply a clear coat of regular nail varnish once a week to maintain the appearance of your manicure as well as prevent any scruffs or chipping.
When using gel polish it is important that you take breaks between each fresh application. This is to ensure that your natural nails are kept in good condition and to prevent any lasting damage to your natural nails.

Take time to master the gelly sandwiching technique and you will be able to speed up the process as you become more confident working with gel polish products.
As gel polishes can often be more expensive than regular nail polish this method is a great money-saving alternative to purchasing only gel products.
Pro Tip
For the Gelly Sandwiching Technique, apply a thin layer of clear gel polish between colored layers to create a stunning 3D effect. Seal with a topcoat to enhance the depth and shine of your nail art.
Remove Nail Art Created Using the Gelly Sandwiching Technique
Removing nail art created using the Gelly Sandwiching Technique requires a specific approach.
Start by soaking a cotton ball or pad in acetone. Place the washed cotton on each nail, ensuring it covers the entire surface.
To hold it in place, you can wrap each finger with a small piece of aluminum foil, securing the cotton against the nail.
Allow this to sit for 10-15 minutes, softening the gel and traditional nail polish layers. Afterward, gently wipe away the softened polish with an orange stick or a nail scraper.
Repeat the process if necessary, and finish with moisturizing cuticle oil to replenish moisture and prevent drying of the nails and surrounding skin.
This method should effectively remove the layered nail art while keeping your nails in good condition.
Fun Fact
The Gelly Sandwich Technique is a nail art method that originated in Japan. It involves layering clear gel polish between colored layers to create a multidimensional effect, resulting in a stunning and glossy finish that’s gained popularity worldwide.

- 25 Anime Makeup Looks To Help You Discover The Enchanting World Of Anime Makeup in 2025 - September 22, 2023
- 41 Toe-Tastic Toe Nail Designs For Every Season - September 21, 2023
- 75 Dazzling Extensions Of Glamorous Acrylic Nail Designs To Rock Unique Looks - September 20, 2023